Part of South Carolina

Part of South Carolina
Membkin Abby Park In South Carolina

Sunday, December 15, 2013

The Easiest Homemade Wheat Bread Ever Made (Best Wheat Bread)

Well, Pennies & Pancakes has done it again!  I SO love her blogs!  As I have mentioned in the past, I happened to be frugal and really want to get back to the basics like back in the good old days where simple and fresh food was just simply awesome! Her Best Wheat Bread happens to be one.  It's not too sweet and perfect for sandwiches, homemade jams, preserves, or even just honey/cinnamon butter will just sweeten it up.
Just out of the oven
When I decided to try this recipe out, I wanted to take a loaf over to church for Christmas gathering tonight.  It was a hit with the people there!  A whole loaf of bread was gone.  

Here is her recipe.
It makes two 9" loaves

INGREDIENTS
3 cups lukewarm water
1 1/2 tablespoons yeast
3 tablespoons honey or sugar
1/3 cup oil
2 1/2 teaspoons salt
3 cups white flour
4-6 cups whole wheat flour

DIRECTIONS
In a large bowl, dissolve the yeast and sugar in the warm water. Let the yeast bubble and grow for 10 minutes. (Longer is okay) Add the oil. Add the salt, white flour, and 4 cups of the wheat flour. 

Knead all ingredients for 6-8 minutes, adding additional wheat flour in small amounts as needed. The dough should be smooth, elastic, and slightly sticky, pulling away from the sides of the bowl. 

Cover, and let rise until doubled. 

Punch it down, and form into 2 loaves. Place the loaves into 2 greased 9" bread pans, cover again, and let rise until the highest point of the dough is about 1/2 inch above the level of the pan. While the loaves rise, pre-heat the oven to 350 degrees.

When the loaves have fully raised, bake them for 25 minutes. Remove the loaves from the pans onto a cooling rack.

My step by step photos to help you out!

This is my brick.  The reason why I call it brick is because it feels like a brick until you open it.  I like to buy this by the bulk because it's cheaper and easier to use.  I always store it in freezer so it won't become rancid.  I normally get it at Sam's Club.  It comes in three.  Yes all three are in freezer!  Better safe than sorry! You can use the packets too.  
Honey or sugar: your choice
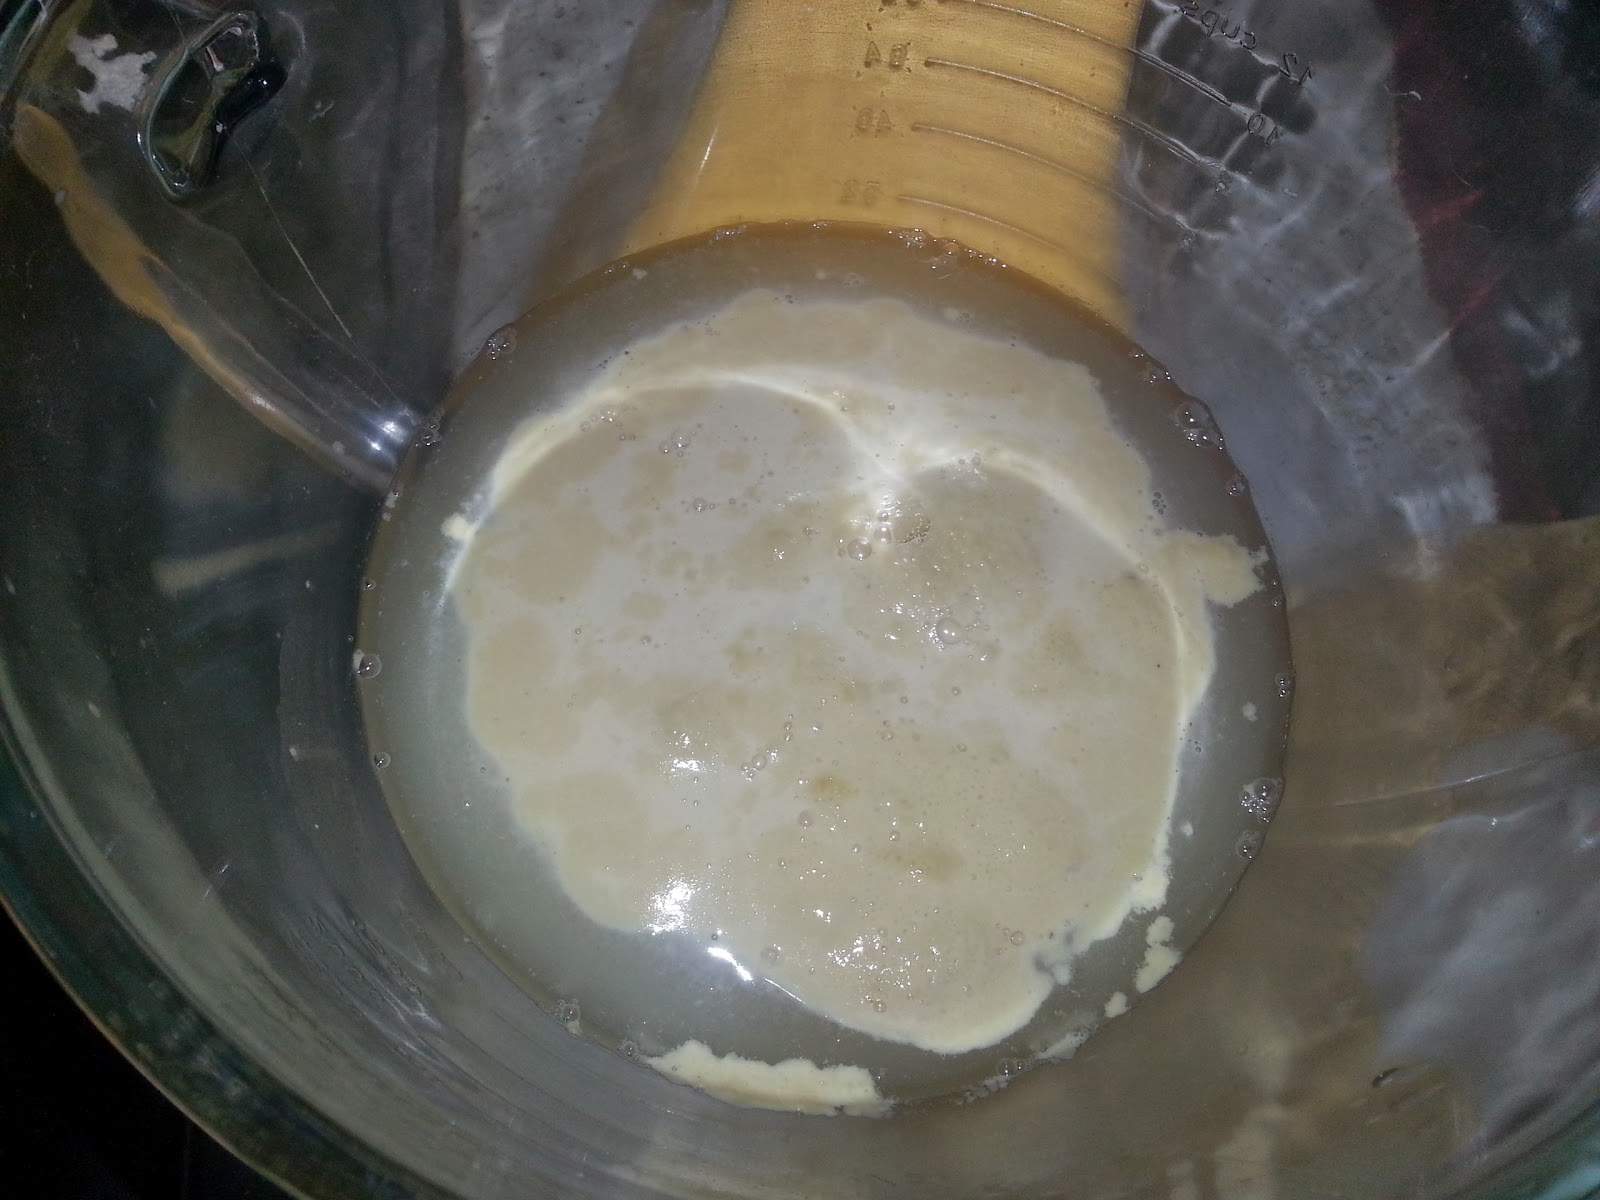
This is what it looks like couple of minutes after adding warm water, honey and yeast.  It will bubble up.  Don't worry if you see yeast clumping up.  They will eventually get soft and bubble up.
It should look like this after 10 minutes.  Then just add oil.

White and wheat flour
dry mixture of salt and both flours
Take your time adding flour mixture.  I had my trustworthy KitchenAid speed set on 2 or 3.  

                    Slowly but surely, it's getting there.  Too wet and still sticking to the bowls.

         Almost there!  As you can see, it's getting ready to form a ball around the KitchenAid hook.
There!  See how it came together to form a ball around the hook and it's not sticking to the bowl?  it took appox. 7 to 8 min to knead before it formed.


As you can see, it will be sticky when you bring it out of the bowl to knead some more with your hands.  It                                                         will be messy but fun, though!


I like to put about 2/3 cup of wheat flour on my board before adding my dough on top of it.  You can see how it's wet and sticky.  Just knead and add a little of flour as needed from the board at a time.  I didn't use all the flour on the board.

After kneading for about 3 to 4 minutes, it should look like this, smooth and slightly sticky.  If it's sticky to your fingers, that's fine.


Put the dough in a bowl.  I used this trick since my kitchen isn't warm all the time.  I just turn on the oven to 400 degrees for one minute, then turn it off.  Cover the bowl with a dish towel or saran wrap. Put it in the oven.  It'll help to speed it up.  Pennies & Pancakes does it differently.  Whatever rocks your boat will work.

Ah!  Very photogenic!  It doubled in size in 30 minutes instead of an hour.
Once again, my absolute favorite part, punching it! it will fall after punching a hole in it.

grease your pans and divide the dough into two parts and put both of them in pans.  Let the dough rise again until it's above the pans between 30 min to an hour depending on how warm the area is.
30 minutes later, the dough has risen.
Preheat the oven to 350 degrees and bake them for 25 minutes.  It should NOT take longer than 25 minutes.


Delish with honey/cinnamon butter!

Until next time.  I will be experimenting with just whole wheat flour.  So keep an eye for it!


Thursday, December 12, 2013

The Easiest White Bread You'll EVER Make! (Grandma's Country White Bread)

                                   Just looking at this makes me want to make some more now!


For couple of years, I have been experimenting and searching for an easy recipe for white bread.  As you know my motto, I've been going back to basics and am looking for good old fashioned recipes.  One day, I came across this bread recipe by accident.  I was actually doing a research on something else.  When I read it, I knew I struck gold.  Off running to the kitchen, I go!

Here is the recipe.  It is not mine, but I will post it.

INGREDIENTS     
Makes two loaves
3 cups luke-warm water(the best way is to test it against your inner wrist)
1/4 cup sugar
1 1/2 Tbsp. yeast
1/3 cup oil
1 Tbsp. salt
6 - 7 cups all-purposed flour ( I ended up using more than 7 cups.  It depends on the day! Don't ask me why! Just add more flour when it's not too sticky and it pulls away from the bowl and easy to knead is the best advice I can give you.)
DIRECTIONS
In a large mixing bowl, dissolve yeast in warm water and sugar. Let sit 10 minutes. Add the oil. Add the dry ingredients starting with 6 cups of flour. Mix all together. Knead the dough thoroughly until all ingredients are incorporated, and dough is smooth, elastic, very slightly sticky, and pulls away from the bowl (6-10 minutes). As you knead the dough, you may add more flour as needed, and repeat the process until dough reaches the desired consistency. 

Cover the bowl of dough with a dish towel or plastic wrap and let rise until doubled (an hour or more depending on how warm your kitchen is.) You may speed up this process by placing the covered bowl inside the oven with the oven light on, and another bowl of warm water sitting on the lower rack.

Punch the dough down, divide and and form into 2 loaves. Place the dough in 2 greased bread pans. (I use 9" pans.) Cover and let rise till the top of the dough is an inch or two above the bread pans.

Bake at 375 degrees for 25 minutes. Remove the baked loaves from their pans immediately, and place on a cooling rack. Slice, and serve warm with butter and honey.

Store in an air-tight bag. Baked loaves AND bread dough freeze well. 


This is after I added the oil after letting the yeast, sugar and lukewarm water rest for 10 min.
                                                  adding flour mixture to wet mixture
Needs more flour
Add more
More flour.  See how it sticks to the bowl. Keep adding til it doesn't stick that much to the bowl.
It should look like this when you're about to knead for a bit.
Knead til silky, smooth, and slightly sticky.
transfer to a bowl, cover and let rise double the amount.  It stated an hour.  It took me more than an hr because my kitchen wasn't warm.  But I found out another cool trick which I will be trying on my next batch.  The trick is turn on your oven to 400 F for a min. then turn it off.  Stick the bowl of dough in the oven.  Make sure the oven is off! It will help the dough to rise.
My favorite part!  Punch a hole! Only one punch is needed, unfortunately.
Divide the dough into 2 equal loaves.  Place them in loaf pans and let them rise until they rise just above the pans.
Bake them at 375 F for 25 min.  They should look like this.  They taste soo good hot with melted butter slathered on them!  After they cool down, you can store them in bags.  Since I live out here in South Carolina, there's a lot of humidity.  I have to store my bread in the fridge so they won't mold quickly. If you have a family, a loaf will be gone quickly.  This bread is perfect for making sandwiches with.  Enjoy!


Saturday, December 7, 2013

Homemade Tortillas

                              Ahhh!  Homemade tortillas


                                                 Yes!  Homemade and easy to make!

The first time I ever had homemade tortilla was when I married into a Hispanic family.  I was 19 yrs old. My ex mother in law made them daily.  I used to watch her make them quickly, but I didn't learn to make them yet.  This didn't happen until 5 years ago.  I can't stand the taste of store bought tortillas. They have chemicals and preservatives and that awful aftertaste. I knew I had to do something.   I set out trying out different recipes, remembering what my ex mother in law did, (No, I didn't call her for help!  Can you imagine?) and trials and errors.  Finally, found my own recipe.  However, I stumble across a site whose recipe's is eerily similiar to mine. (mine has more baking powder). I promise you, it doesn't take that long to make them, probably about the time it takes to do biscuits,  Once you get the hang of it, you'll be making them like a pro!  Also, I can almost guarantee that once you taste your homemade tortillas, there's no turning back to store bought tortillas!  Plus, it's WAY cheaper than the ridiculous prices on store bought tortillas!  Btw, for those who are on gluten free diet, I have NO idea how to make this gluten free.  I am not familiar with gluten free diets,  Sorry!  
Now shall we get started?

3 cups  flour
2 tsp salt (you can use less.  I like to have flavor in mine)
2 1/4  tsp baking powder
1/4 cup plus two TBS of shortening or lard (break the shortening up in pieces before adding to flour mixture)
1 1/4 cups of warm water(not hot or it'll melt the shortening,  You don't want that)

Note:  You can use butter but I never used butter or fake butter in mine.  I prefer the old fashioned way,  Believe me, it really tastes good with lard.  Most of the time I just use shortening. 

1. Mix flour, salt and baking soda.
2. Add shortening/lard
3. Mix shortening/lard into flour using your hand or fork.  I prefer my hand so I can feel the texture and be able to form a loose ball before adding water. Mix until you are able to form a crumbling ball. That's how my ex mother in law did.  See photo.

                                           it should be able to hold a crumbling shape.

4.  Make a little well in the mixture.
5.  Add warm water and mix well. Knead and fold until it's not sticky and smooth,

                                          It should look like this.  Smooth and not sticky.

6. Leave in bowl and let it sit approx. 15 to 20 min.  Why?  Well, if you want me to get all technical about different type of flours and why they need to rest, I'll just bore you to death or lose you while explaining.  However, I can say this in easy term.  I've noticed when I let them sit or rest for a certain time, they're easier to handle and not wounded up tightly.  I also noticed they don't shrink back as quickly especially when rolling them out.  Ok, moving on.

7.  Break them into about 12 balls. They make average sized tortillas like the store bought kind.

8.  As you try to form them into balls, tuck the bottom in as if you're making a putt.  That's how my ex mother in law did.  I couldn't figure out why til it dawned on me why.  First couple of times, I used to just roll them into balls in my hands, they didn't roll out easily.  You need to work with the pieces as if you're kneading and working with them while folding underneath.
                                          See how they're not perfectly round?

9.  Cover them in bowl for about 20 min.

10.  Take one out and start flattening them out with rolling pin,  I usually start from the middle to out. Then I would turn between 45 degrees to 90 degrees while rolling them out.  I don't use a lot of flour to coat them or the rolling pin or otherwise you'll end up smelling burnt flour while cooking the tortillas.
By the way, it doesn't have to perfectly round, Practice on turning 45 to 90 degrees angle while rolling out.
11. Preheat pancake grill or cast iron skillet on approx med to high med heat.   Do NOT use non stick pan,                                              

Once the pan is nice and hot, put the raw dough on.  Don't worry if it bubbles.  Use your tongs so you won't burn your fingers or hand while turning.  it should be brown on both side.  If you burn one of them, turn off heat and clean out the pan thoroughly before resuming,  If you don't, the rest of your tortillas will taste burnt.  I learned my lesson.  You don't want that. Average cooking time is 30 seconds on each side.
You can make your tortillas thick or thin,  the ones above are thin,  My son likes his thick.  It's up to you.
Now, I'm using mine for homemade burritos.  I'm in heaven!

If you have any left over tortillas,(I promise you, if you have a family, these will be gone!) just store them in plastic bag or zip lock.  I keep mine in the fridge because I live in the deep south where there's a lot of humidity.  I know if I was back in Colorado, mine would be in my bread box or gone! I have never froze my tortillas before.
You can warm the tortillas in aluminum foil in oven.  I never reheat in microwave because it tastes rubbery.
You can use these with eggs, meat, peanut butter, cheese.  Just be creative!
Enjoy your homemade tortillas!